
Author: Sean Chang
Background
If you would like to join different systems and combine wireless accounts in your current non-Microsoft Active Directory environment by a single auth server, the low-priced easiest way surely is using open source projects to setup your own LDAP Directory service.
The most popular open source LDAP Directory server project is OpenLDAP. However, We can find many OpenLDAP examples on net. But when it comes to back-sql, especially when you need to integrate authentication by existing user accounts of current system, which were stored in MSSQL backend, you can find only MySQL and PostgreSQL success stories.
We wish this document can deliver some useful hints on how to deal with OpenLDAP with backend MSSQL.
LDAP is based on a simpler subset of the standards contained within the X.500 standard. Different than RDBMS, such as Oracle, MSSQL, MySQL. LDAP is a tree structure planned for best searching performance. We do not recommend using RDBMS as LDAP backend, unless you have a MUST-TO reason.
Resources
You can learn more about LDAP Directory service through these websites.
- Network Working Group RFC 4511 - IETF.org
- Lightweight Directory Access Protocol - WIKIPEDIA
- OpenLDAP - OpenLDAP open source project site
Table of Contents
- Components Installation
- freeTDS Installation
- Configuration of each component
- Setting Up OpenLDAP
- Verify OpenLDAP Configurations
- Misc.
- Further Readings
Components and Software Version
- OpenLDAP Server
- OS: CentOS 6.5 (64-bit)
- OpenLDAP: 2.4.23
- unixODBC: 2.2.14
- freeTDS: 0.91
- Remote Database
- OS: Microsoft Windows 2008 Server R2
- Database: Microsoft SQL Server 2012
Basic Scenario
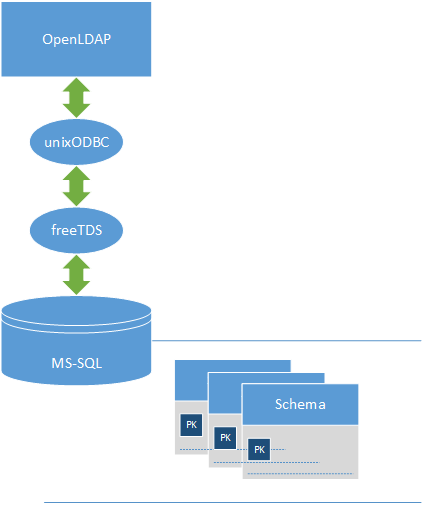
To use OpenLDAP with backend Microsoft SQL Server, you have to find a correct way to link them together. The following is our scenario:
- Using freeTDS driver to link Microsoft SQL Server, and set freeTDS as an ODBC datasource
- OpenLDAP using unixODBC driver to link with freeTDS ODBC
- The logical structure:
Before We Start
The following processes begin after you finish the installation of operation system. We setup our OS using CentOS Minimal Installation, and then wget tool has been installed.
You can learn how to install CentOS Minimal in this article: How to install CentOS 6.5 minimal by rasho on LINTUT
1. Components Installation
Because we are so lazy hope this document can more clean and clear, we install our components using yum with root account in the following processes.
Of course, you can finish same procedures by using sudo with user account. And to install all components using rpm is definitely ok too.
#yum install openldap openldap-clients openldap-servers openldap-devel openldap-servers-sql
#yum install unixODBC unixODBC-libs unixODBC-devel
2. freeTDS Installation
2.1 Set Environment variable
Use vi or nano to edit /etc/profile, adding this section at the end of file:
# TDS
    SYBASE=/usr/local
    LD_LIBRARY_PATH=${LD_LIBRARY_PATH}:$SYBASE/lib
    export SYBASE LD_LIBRARY_PATH
2.2 Download and unpack freeTDS
You can find the download link in freeTDS Project Site. Generally they will not modify the link of stable version.
ps. You may switch to
/tmpdictionary first
#wget ftp://ftp.freetds.org/pub/freetds/stable/freetds-stable.tgz
#tar -zxf freetds-stable.tgz
#cd freetds-0.91 ||REPLACE WITH YOUR VERSION NUMBER
2.3 Install freeTDS
#./configure --with-tdsver=8.0 --with-unixodbc=/usr/local
#make
#make install
The general freeTDS installation paths is:
- Library:
/usr/local/lib - Configuration:
/usr/local/etc
3. Configuration of each component
3.1 Prepare LDAP Database on your MSSQL Server
Before we start to config all components, the first step is to create sample database and data for LDAP service in your SQL Server.
You can find these samples at the latest version of OpenLDAP on OpenLDAP Project site. Download and unpack it, the sample scripts are located in \servers\slapd\back-sql\rdbms_depend\mssql. Of course, you can download Sample MSSQL Schema from here.
We recommend you execute these scripts through SQL Server Management Studio:
Create LDAP database
We assume the database name is
LDAPExecute
backsql_create.sqlinLDAPdatabaseCreate OpenLDAP Schama
Execute
testdb_create.sqlinLDAPdatabaseCreate Sample Data Tables
Execute
testdb_metadata.sqlinLDAPdatabaseCreate Sample Metadata
Execute
testdb_data.sqlinLDAPdatabaseCreate Sample Data
3.2 freeTDS to Microsoft SQL Server
Use vi or nano to edit /usr/local/etc/freetds.conf, adding this section at the end of file:
[MSSQL]
#REPLACE WITH YOUR MSSQL SERVER IPv4 ADDRESS
host = 192.168.1.100

#REPLACE WITH YOUR MSSQL SERVER LISTENING PORT
port = 1433

tds version = 8.0
client charset = UTF-8
3.3 Confirm freeTDS Configuration
You can test the connectivity between freeTDS and SQL Server using this command:
#tsql -S MSSQL -U username -P password
If your settings were correct, you will see a reponse like this:

Type exit to leave.
3.4 unixODBC to freeTDS
3.4.1 odbcinst.ini
Use vi or nano to edit /etc/odbcinst.ini.
There are default
PostgreSQLandMySQLsettings. We will not use these database, you can mark them as unused.Adding this section at the end of file:
[FreeTDS]
Description=ODBC for SQL Server
Driver=/usr/local/lib/libtdsodbc.so
UsageCount=1
3.4.2 odbc.ini
Use vi or nano to edit /etc/odbc.ini, adding this section at the end of file:
[MSODBC]
Driver=FreeTDS
Description=Mikotek SQL Server
Trace=No

#REPLACE WITH YOUR MSSQL SERVER IPv4 ADDRESS
Server= 192.168.1.100

#REPLACE WITH YOUR LDAP DATABASE NAME
Database= LDAP

#REPLACE WITH YOUR MSSQL SERVER LISTENING PORT
Port=1433

TDS_Version = 8.0
Charset = UTF-8
3.5 Confirm unixODBC Configuration
You can test the connectivity between unixODBC and SQL Server using this command:
#isql -v MSODBC username password
If your settings were correct, you will see a reponse like this:
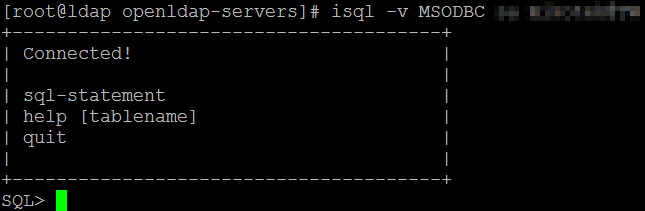
Type quit to leave。
4. Setting Up OpenLDAP
4.1 Generate a Secure Password
In later section, we will set up an OpenLDAP administrator and an administrative password. OpenLDAP supports plaintext password, and an encrypted password like MD5, SHA, CRYPT is supported too.
We are going to use CRYPT password this time, you can generate a secure password by slappasswd -h {crypt}:
#slappasswd -h {crypt}
New password:
Re-enter new password:
{CRYPT}4kXX4T1wXj3Zc
The {CRYPT}4kXX4T1wXj3Zc is the encrypted password. Copy it, we will need it later.
4.2 Copy slapd.conf from OpenLDAP Template
#cp /usr/share/openldap-servers/slapd.conf.obsolete /etc/openldap/slapd.conf
4.3 Remove and Backup Default BDB Database
#mv /etc/openldap/slapd.d /etc/openldap/slapd.d.bak
4.4 slapd.conf Configuration
Use vi or nano to edit /etc/openldap/slapd.conf.
4.4.1 Section: include
We will need only the following LDAP schemas in this practice:
include    /etc/openldap/schema/core.schema
include    /etc/openldap/schema/cosine.schema
include    /etc/openldap/schema/inetorgperson.schema
You can mark other schemas as unused.
4.4.2 Section: module
We are using 64-bit system, and use only back_sql module, you can mark other modules as unused.
modulepath /usr/lib64/openldap
moduleload back_sql.la
4.4.3 Section: TLS Certificate Configuration
OpenLDAP supports SSL connection, you can set up TLS configuration in this section.
However, we DO NOT include the know-how of SSL setup in this practice. You can mark the TLS section as unused for now. If you were interested in OpenLDAP SSL configuration, you may find some useful hint in this document: Configure OpenLDAP with SSL/TLS
4.4.4 Section: ACL Configuration
ACL 1: Alow Users view and change their own password
access to attrs=userpassword
    by self write
    by anonymous auth
    by * none
ACL 2: Allow Authenticated Users to View, Limit Anonymous Users to Auth
access to *
    by self write
    by users read
    by anonymous auth
    by * none
4.4.5 Section: Database Definitions
There is a default BDB database definition in template config file. We are going to set up a SQL database, so mark whole default BDB database section as unused.
Adding our SQL database definition at the end of file:
###################################################
# sql database definitions
###################################################

database        sql
suffix          "dc=example,dc=com"
rootdn          "cn=Manager,dc=example,dc=com"

#REPLACE WITH YOUR SECURE PASSWORD
rootpw          {CRYPT}4kXX4T1wXj3Zc

#ODBC DATASOURCE NAME
dbname          MSODBC

#REPLACE WITH YOUR MSSQL LDAP DATABASE USER
dbuser          username

#REPLACE WITH YOUR MSSQL LDAP DATABASE USER PASSWORD
dbpasswd        password

subtree_cond    "ldap_entries.dn LIKE '%'+?"

has_ldapinfo_dn_ru      no
###################################################
4.5 ldap.conf Configuration
Use vi or nano to edit /etc/openldap/ldap.conf.
Define LDAP base, and set the LDAP uri according to your environment:
BASE    dc=example,dc=com
URI    ldap://ldap.example.com
5. Verify OpenLDAP Configurations
5.1 OpenLDAP Config Testing
You can verify your config file using this command:
#slaptest -u
If your settings were correct, you will see a reponse like this:
config file testing succeeded
5.2 Launch the Slap Daemon
#service slapd start
5.3 Test Connectivity and Data with LDAP client
You can perform a LDAP search by ldapsearch, using this command to verify LDAP working functionally:
#ldapsearch -x -D cn=Manager,dc=example,dc=com -w YOUR_LDAP_ROOTPW -b dc=example,dc=com
REPLACE
YOUR_LDAP_ROOTPWwith your definition
If your settings were correct, you will see a reponse like this:
# extended LDIF
#
# LDAPv3
# base <dc=example,dc=com> with scope subtree
# filter: sn=Kovalev
# requesting: ALL
#

# Mitya Kovalev, example.com
dn: cn=Mitya Kovalev,dc=example,dc=com
objectClass: inetOrgPerson
cn: Mitya Kovalev
sn: Kovalev
seeAlso: documentTitle=book1,dc=example,dc=com
seeAlso: documentTitle=book2,dc=example,dc=com
givenName: Mitya
userPassword:: bWl0
telephoneNumber: 222-3234
telephoneNumber: 332-2334

# search result
search: 2
result: 0 Success

# numResponses: 2
# numEntries: 1
6. Misc.
6.1 Automatic Launch OpenLDAP service on system boot
#chkconfig --add ldap
#chkconfig ldap on
7. Further Readings
For now, you are successfully integrate OpenLDAP with backend Microsoft SQL Server.
If you were interested in LDAP data design and metadata planning, you may find some useful information in these websites:
- Setting up LDAP with back-sql - Flat Mountain
- Sample MySQL schema for OpenLDAP with back-sql - WingFOSS
- Common LDAP schemas - oav.net